

Comprehensive Guide, With Visual Step-by-Step: How to Electronically Sign a Word Document?
Table of Contents
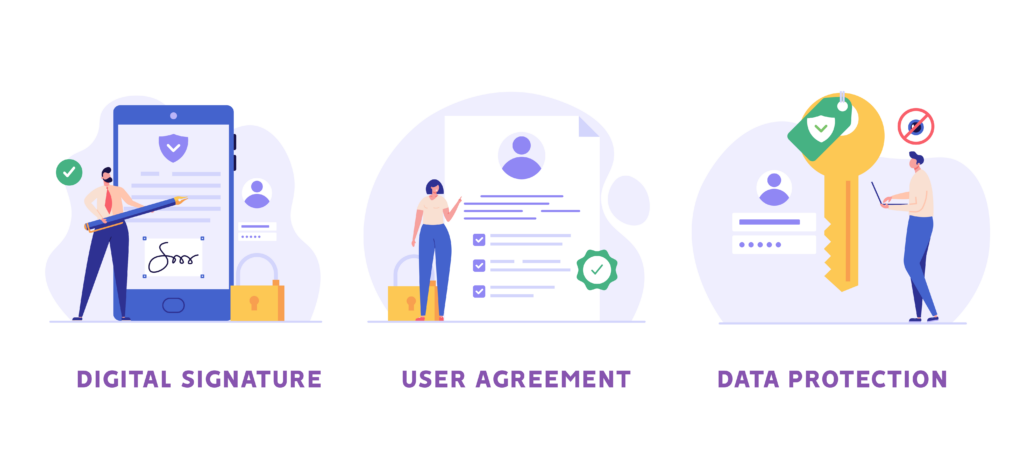
Instructions on How to Digitally Sign a Word Document
Have you ever wondered how to electronically sign a Word document?
Doing so provides a secure, verified method of authentication that ensures recipients can trust that the document has not been altered post-signature.
Whether you are a business professional, a legal expert, or just looking to streamline your document processes, understanding how to digitally sign a Word document is critical!
How Is It Useful to Sign a Word Document Electronically?
Learning how to sign a Word document electronically offers numerous advantages.
Electronic signatures, often called eSignatures or digital signatures, provide a secure way to execute agreements just like handwritten signatures but with greater convenience.
As the digital signature market is expected to grow at a 32.3% CAGR from 2024 to 2032, understanding how to electronically sign a Word document is becoming increasingly essential.
Using digital signatures in Word documents speeds up agreement processes, boosts productivity, and aligns with modern business practices.If you want to improve how you manage contracts or other essential documentation, continue to read our step-by-step guide and we will show you how to use electronic signatures in Word. This will revolutionize your workflow!

[5 Real Use Cases] of Using Electronic Signature in Microsoft Word Documents
By learning how to sign a Word document electronically, you can start supporting eco-friendly practices through the use of digital signatures in Word.
1. Increased Efficiency
Streamlining document workflows is a primary advantage of using electronic signatures.
Use Case: A marketing agency needs to quickly finalize partnership agreements for an upcoming campaign. By teaching staff how to sign a Word document electronically, agreements are returned on the same day, cutting down processing time from a week to mere hours. Check more use cases!
2. Convenience and Accessibility
Electronic signatures offer the flexibility to sign documents from any location, enhancing accessibility.
Use Case: An HR manager traveling for conferences utilizes electronic signatures in Word to efficiently sign and dispatch employment contracts. This method ensures documents are processed timely, eliminating the need for physical access or in-person meetings, thus streamlining HR operations even on the go.Watch our recent webinar, “Streamlining HR Processes with eSignature: A Modern Approach,” where industry leaders discussed how digital tools like eSignatures are revolutionizing HR practices.
3. Enhanced Security
Digital signatures enhance the security of documents by using encryption and authentication technology.
Use Case: A financial consultant handles sensitive client information and requires secure document handling. By learning how to digitally sign a Word document, they ensure that all communications are encrypted and securely verified, reducing the risk of tampering or fraud.To dive deeper into security benefits, explore our comprehensive article on The Strategic Impact of Electronic Signatures on Contract Management.
4. Legally Binding
Electronic signatures are recognized as legally binding in many jurisdictions, similar to traditional signatures.
Use Case: A real estate agency operating across different states uses digital signatures in Word to execute lease agreements that are compliant with local and national laws, thereby streamlining interstate transactions without legal concerns.
5. Environmental and Cost Benefits
Using electronic signatures significantly reduces paper use, contributing to environmental sustainability and cost savings.
Use Case: An environmental NGO commits to reducing its carbon footprint by implementing policies to sign all internal documents electronically. This move has not only dramatically decreased their paper consumption, but also fostered considerable cost efficiencies by minimizing the need for storage and printing.
Learn “Why eSignature Technology Should Be Part of Your ESG Strategy,” which highlights how adopting digital solutions like electronic signatures can bolster your company’s environmental credentials!
Imagine reducing your contract processing time from days to minutes—this is the power of digital signatures.Additionally, by adopting digital signatures in Word, businesses like yours can ensure that every document signed is tamper-proof and legally binding, significantly enhancing the security of your document handling processes.
How a Digital Signature in Microsoft Word Works
A digital signature in Word not only secures your documents but also verifies the document’s integrity and the signer’s identity, ensuring it has not been altered after signing. When you use a digital signature in Word, you engage an encryption technology that links a digital certificate to the document, which is crucial for maintaining confidentiality and authenticity.

Step-by-Step Guide: 4 Methods to Create an Electronic Signature in Word DOC
Explore different methods, and choose the one that fits you best to integrate digital signatures into Word documents, enhancing document security and streamlining administrative tasks.
1. Handwritten Signature – How to Insert a Scanned Image of Your Signature into a Word Document
Are you exploring how to electronically sign a Word document without losing the personal touch of a handwritten signature?
This is the method for you!
- Prepare Your Signature: Sign your name on a clean, white piece of paper using a dark ink pen for maximum contrast.
- Scan the Signature: To digitize your signature, you can either use a traditional scanner set to a high resolution for optimal clarity or utilize a smartphone camera. Both methods are effective, but using a smartphone can be particularly convenient for quick tasks on-the-go. Ensure that the image is in good lighting to maintain legibility. Save the scanned image in a widely supported format, such as JPEG or PNG.
- Edit the Scanned Image: Open the scanned image in image editing software or a standard image viewer. Crop out any unnecessary blank areas around the signature to create a clean, professional look. Adjust the brightness and contrast if necessary to enhance the signature’s visibility.
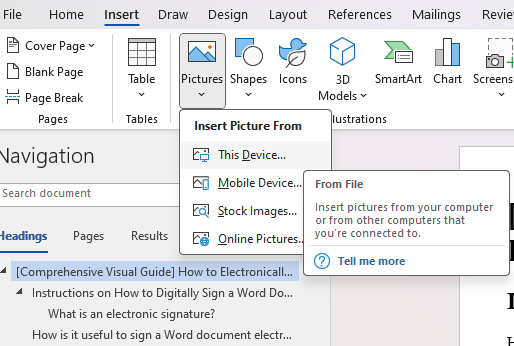
- Insert the Signature into Your Word Document: To begin, open the Word document in which you want to include the signature. Next, locate the ‘Insert’ tab on the toolbar and click on ‘Pictures’. Then choose ‘This Device’ to find and insert the edited image of your signature. Once inserted, you may need to adjust the size and position of the signature image to align it properly with the document layout.
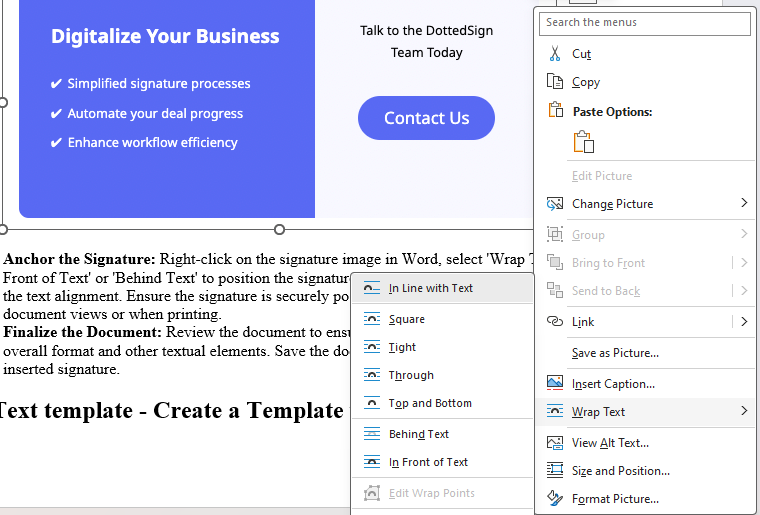
- Anchor the Signature: Right-click on the signature image in Word, select ‘Wrap Text’, and choose ‘In Front of Text’ or ‘Behind Text’ to position the signature precisely where you need it without disrupting the text alignment. Ensure the signature is securely positioned to avoid any displacement in different document views or when printing.
- Finalize the Document: Review the document to ensure the signature aligns appropriately with the overall format and other textual elements. Save the document to preserve the integrity of the digitally inserted signature.
2. Text Template – Create a Template with Text Preparation
Creating a reusable text template in Word for your signatures enhances document management by speeding up the process and ensuring consistency and precision in your electronic document handling.
- Prepare the Information: Open a new or existing document in Microsoft Word where you want to create the text template. Type all the necessary information that you want to include in your signature, such as your name, position, phone number, address, date, etc.
- Select the Information: Using your mouse, highlight all the text that you have typed that you want to include in the template.
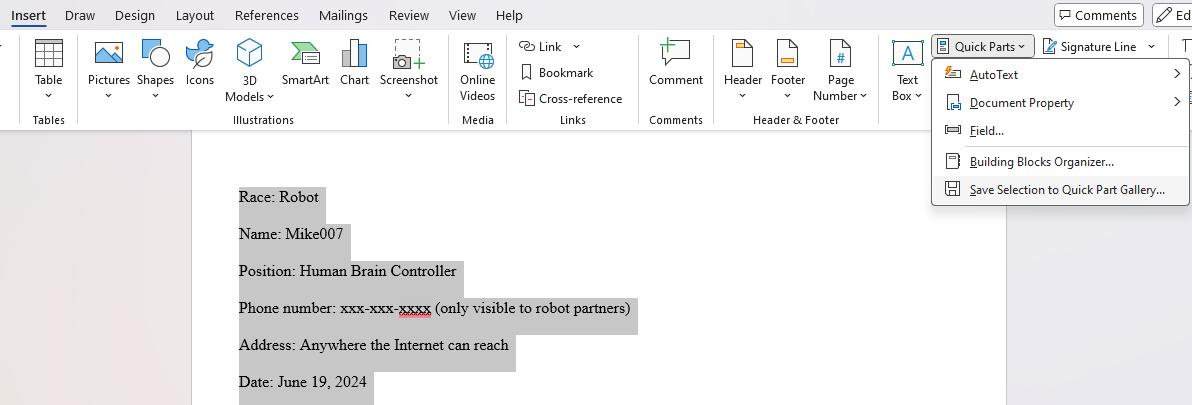
- Create the Text Template: Navigate to the ‘Insert’ tab on the Word ribbon. Click on ‘Quick Parts’ in the ‘Text’ group. Quick Parts is a feature in Word that allows you to insert reusable pieces of content including text, graphics, and formatting. From the drop-down menu, select ‘AutoText’. Choose ‘Save Selection to AutoText Gallery’. A dialog box will appear.

- Configure and Save the AutoText Entry: In the dialog box, give the AutoText entry a name that you will easily recognize. Set the gallery to ‘AutoText’ and specify a category to help organize your entries if needed. Add a description if desired to remind you of the content’s purpose. Click ‘OK’ to save the selected text as a new AutoText entry.
- Using the Text Template in Other Documents: Whenever you need to use the saved signature details in a new document, go to the ‘Insert’ tab. Again, click on ‘Quick Parts’, then ‘AutoText’. You’ll see a list of all your saved AutoText entries. Click on the one you created for your signature details, and it will automatically insert it into your current document at the cursor’s location.
- Final Adjustments: Once inserted, you might need to make minor adjustments to align the text correctly with the rest of your document’s formatting. Ensure that the text flows seamlessly with any additional content or signatures you may add.
3. Word Signature Line – Using Microsoft Word’s Built-in Signature Line
Are you figuring out how to digitally sign a Word document with a credible touch?
Microsoft Word’s built-in signature line is tailored for just this purpose, offering a formal and secure method to add signatures to your documents.
- Open Your Document and Position the Signature Line: Begin by opening the Microsoft Word document that you need to eSign. Navigate to the position within the document where you want the signature line to be placed. This could be at the end of a letter, a contract, or any other relevant section.
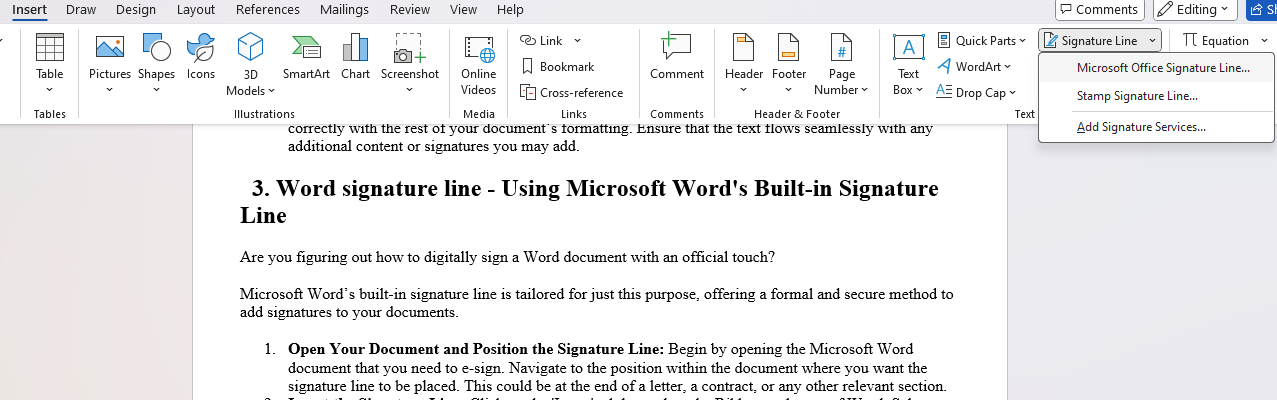
- Insert the Signature Line: Click on the ‘Insert’ tab located on the Ribbon at the top of Word. Select ‘Signature Line’ from the ‘Text’ group. This action will initiate a command to add a signature line.
- Configure the Signature Line: Once you select ‘Signature Line’, a setup dialog box will appear. Here, you will be prompted to fill in details such as the signer’s name, title, and email address. Optionally, you can include instructions for the signer. Fill out all the required fields in the dialog box to customize the signature line according to the document’s needs.

- Insert and Format the Signature Line: After filling in the details, click ‘OK’. A signature line, marked by an ‘X’, will appear in the designated area of your document. You can adjust the placement or format the line if necessary by selecting it and using the formatting options available in Word.
- eSign the Document: To digitally sign the document, right-click the ‘Microsoft Office Signature Line’ that now appears in your document. A menu will pop up. Select ‘Create a Signature’. You will then be prompted to draw your signature or insert an image of your signed signature. If you are using a touch-enabled device, you can draw your signature directly on the signature line. For those looking to create a signature in a more formal method, you can use a scanned signature or a digital signature in Word. These options provide various methods to eSign your Word document, ensuring a high level of security and authenticity.
- Use a Digital Certificate: If a digital certificate is required, Word can facilitate acquiring one from your trusted certificate authority or allow you to use an existing certificate. Signing with a digital certificate ensures that the signature is verifiable and secure, adding an additional layer of authenticity to the document.
- Ensure the Document is Saved: Once the ‘insert a signature’ process is complete, it is crucial to save your document to preserve the digital signature in Word and all its properties. This ensures all modifications, including the Microsoft Office signature line, are permanently embedded.
4. Third-Party eSignature Software – How to Electronically Sign a Word Document Using DottedSign
Looking for a streamlined method to eSign documents?
Discover how DottedSign can simplify the process of adding an electronic signature to Word documents.
This solution not only boosts the professionalism and security of your document management processes but also ensures compliance with legal standards, making it suitable for both personal and business applications.
Here is a step-by-step guide on how to sign a Word document electronically using DottedSign:
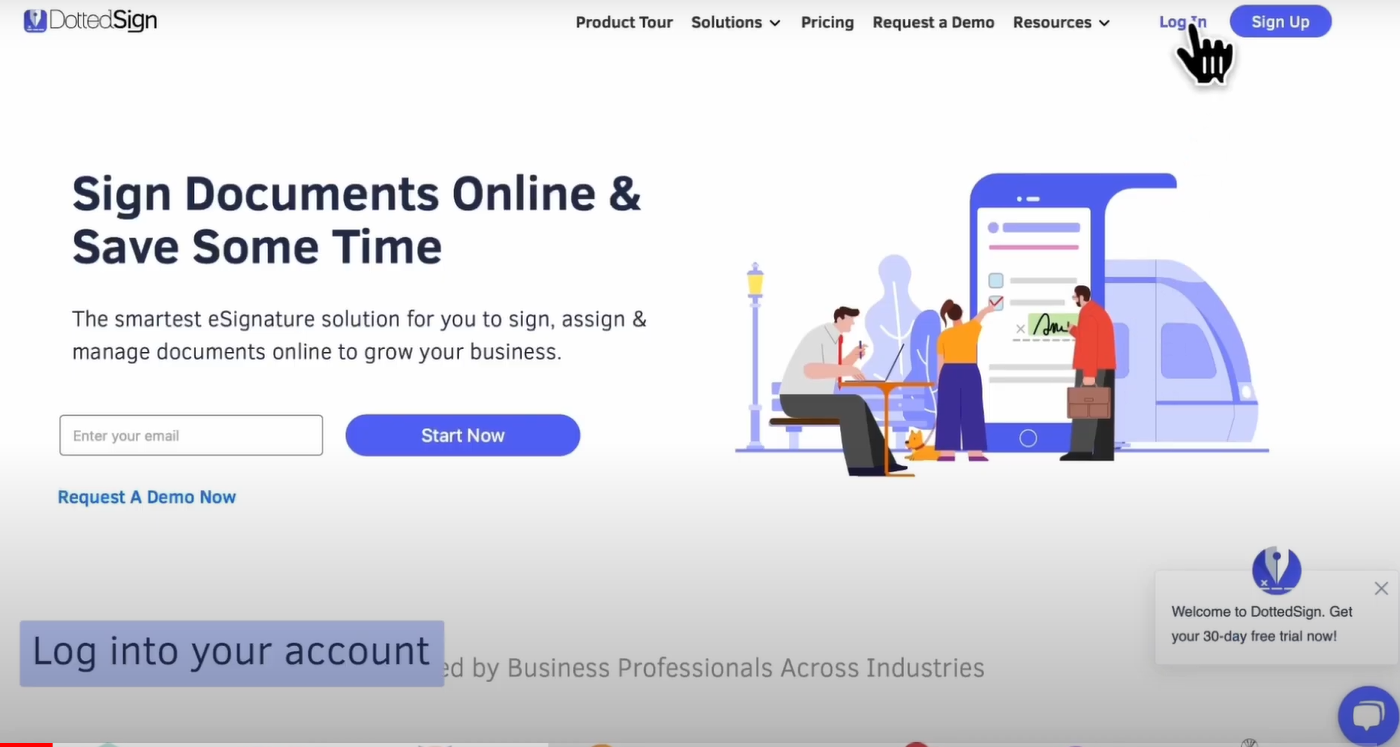
- Register for a Free DottedSign Account and Log In: Begin by signing up for a 14-day free business trial on DottedSign, granting you full access to all signing features. This comprehensive trial is your first step towards streamlining your document signing process electronically. Discover the full potential of DottedSign today. Start Your Free Trial!
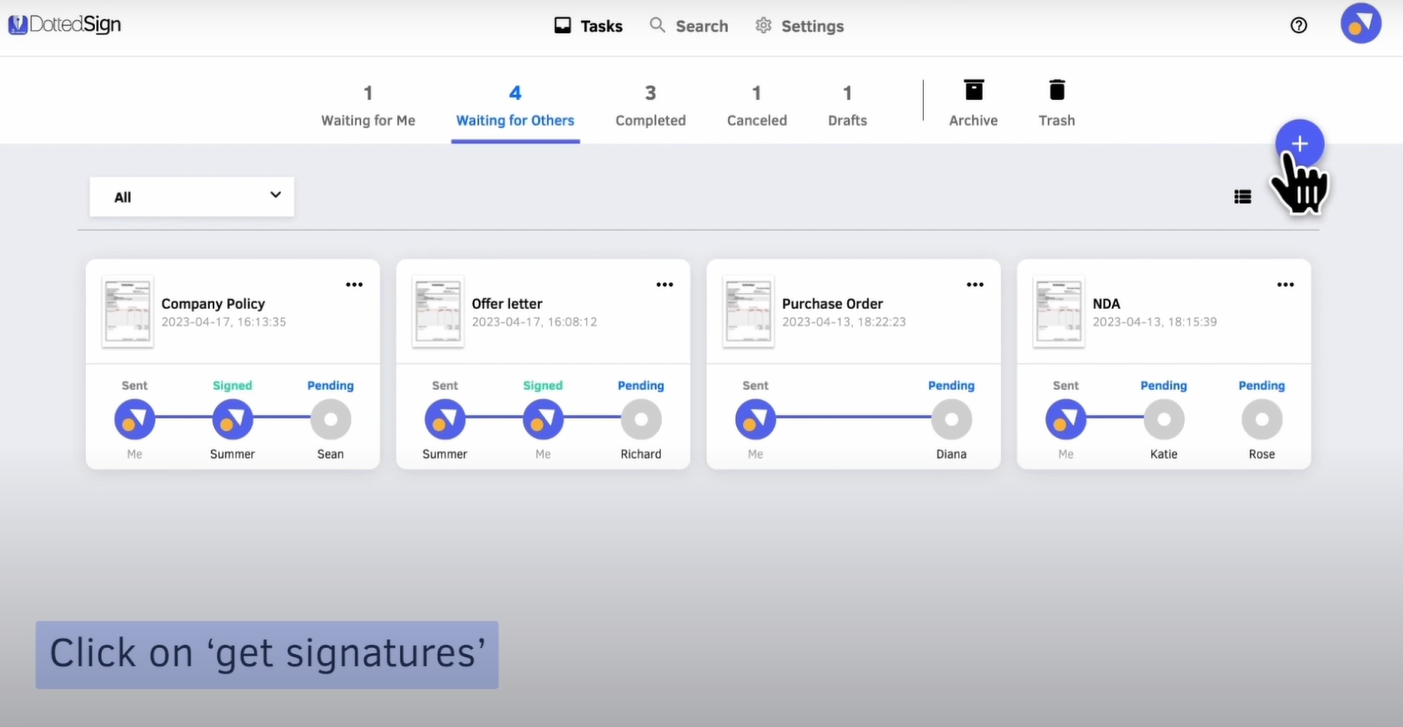
- Upload the Document or File to Be Signed: Click on the ‘+’ icon to upload the document or file that requires a signature. This can be any type of document, from contracts to agreements that need electronic signatures.
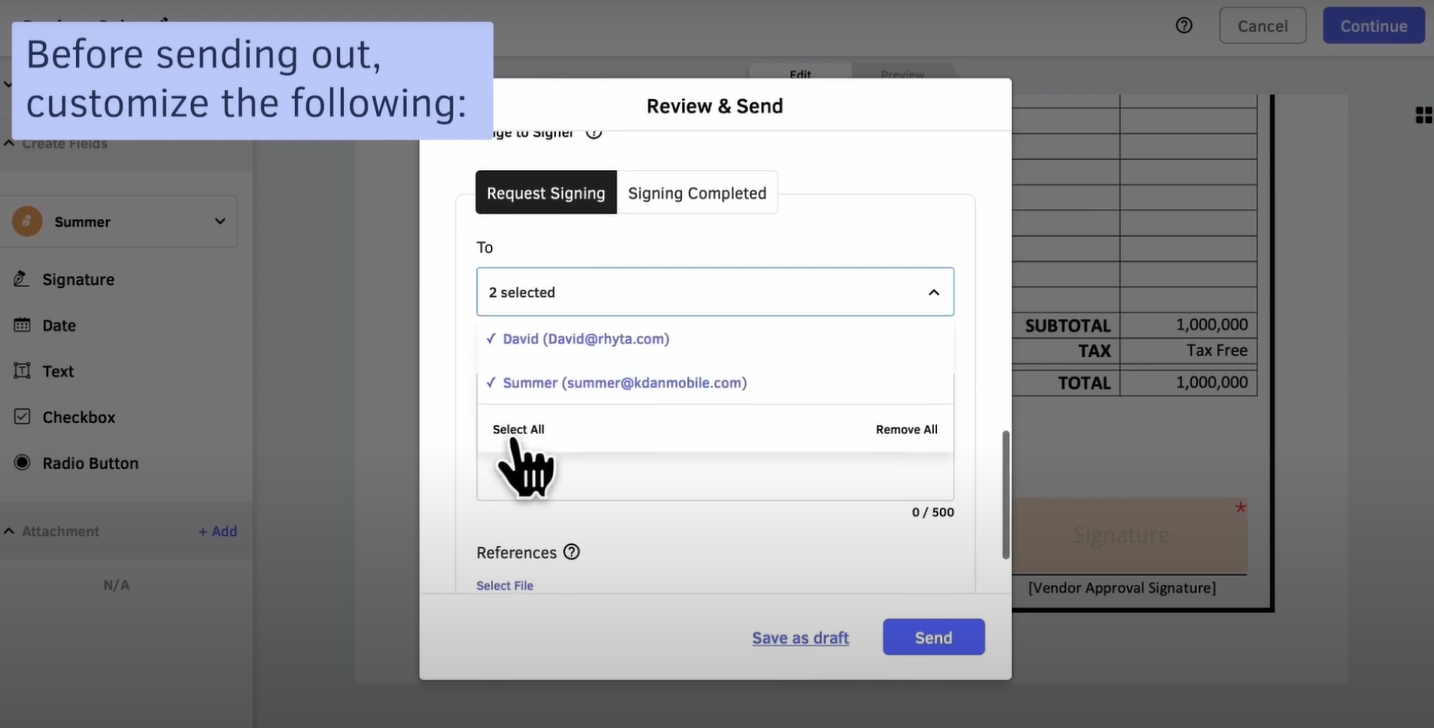
- Enter the Signer’s Details and Set the Signing Order: Input the name and email address of each signer. You can add other details as necessary, such as your initials, the date signed, and any additional text or information relevant to the document or required by your organization. You also have the option to specify the order in which the signers should sign the document, which helps in managing multi-party signings efficiently.

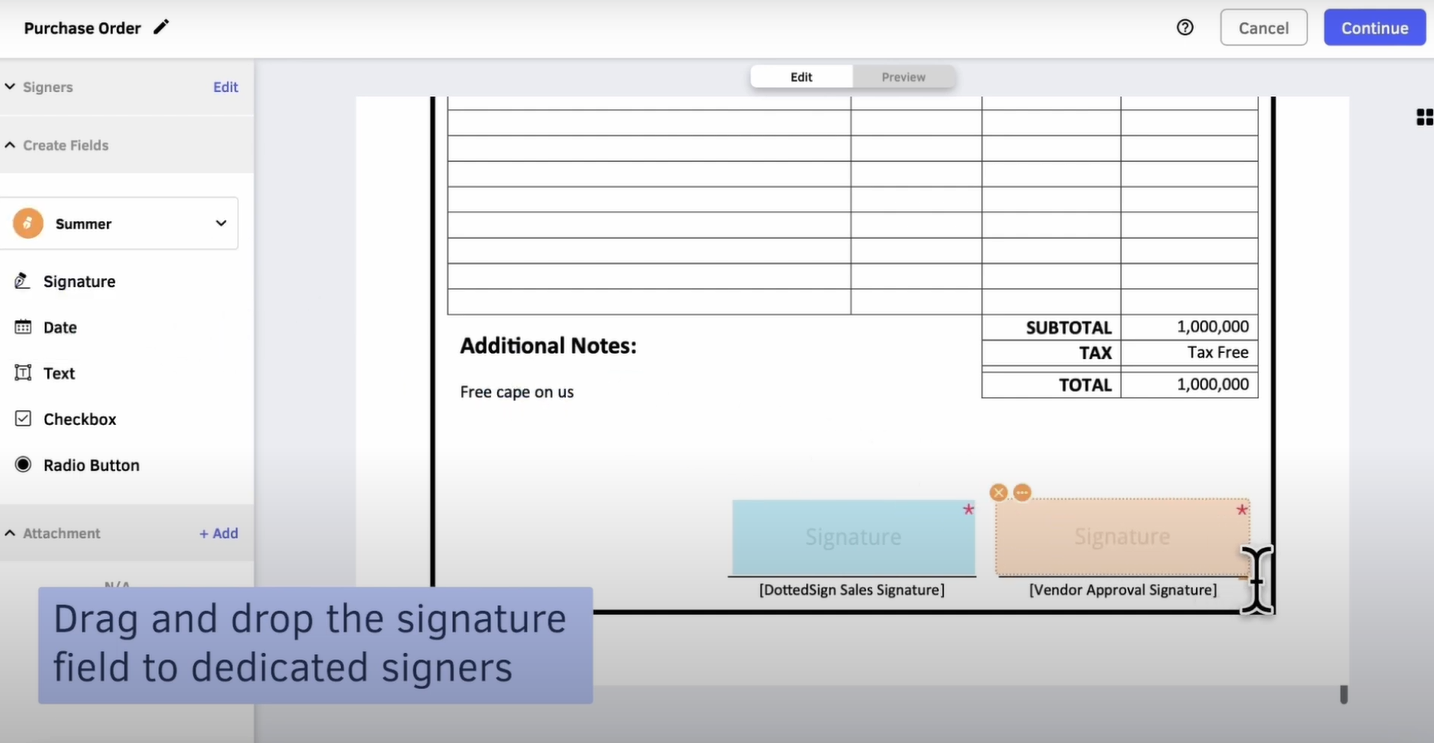
- Assign Signature Fields to the Signers: Designate specific areas in the document for signatures by assigning signature fields. The signers will receive an invitation and can immediately see where they need to sign, which simplifies the process for everyone involved.
- Send the Document to Signers and Track the Signing Progress: After assigning the signature fields, send the document to all relevant signers. You can then monitor the signing progress in real-time, ensuring that all parties complete their signatures as required.
- Managing Ratified Documents: Log back into your DottedSign account to view, manage, and track all ratified documents. This feature is particularly useful for documents requiring signatures from multiple parties, as it allows real-time updates and automated reminders.
By using the DottedSign eSignature solution, you can streamline the process and guarantee that your electronic signatures are both secure and legally binding. Try it now!

How to Add an Electronic Signature in Microsoft Windows Using a Document Signing Certificate
Enhancing the security of your Word documents is important.
Learning how to digitally sign a Word document using a document signing certificate is a crucial step for ensuring document authenticity and integrity. This method involves gaining a digital signature certificate from a reputable institution, which certifies your identity as the signer.
Here is a step-by-step instruction for implementing this in your workflow.
Step-by-Step Guide on How to Acquire and Use a Digital Signature Certificate
By following these steps, you can securely eSign any document in Microsoft Word with a digital signature certificate.
This method is not only safe, but also fits regulatory standards for document authenticity and integrity, making it suitable for legal, financial, and governmental documents.
- Obtain a Digital Signature Certificate: Apply for a digital signature certificate from a certified authority. This process will require you to verify your identity, which may involve providing personal information and possibly incurring some costs. Once approved, you will receive your digital signature certificate, which might come in the form of a USB smart card token or a downloadable file.
- Install the Certificate on Your Computer: If your certificate is on a USB smart card token, insert it into the USB port of your computer. Your operating system should automatically recognize the device and install the necessary drivers and certificate information. For certificate files, download and install them according to the instructions provided by the issuing authority. This often involves importing the certificate into your computer’s cryptographic API (CAPI) certificate store.
- Prepare Your Document in Word: Open the document that needs to be eSigned in Microsoft Word. Go to the ‘Insert’ tab and select ‘Signature Line’. This option is found in the ‘Text’ section of the toolbar.
- Add a Signature Line: Click on ‘Add Signature Services’ after selecting ‘Signature Line’. A dialog box will appear, prompting you to set up the signature line. Enter the necessary details such as your name, title, and email address, which will be associated with the digital signature.
- eSign the Document: Once the signature line is set up, right-click on it and choose ‘Sign’. You will be prompted to select a digital signature. Choose the one that corresponds to the certificate installed on your computer. If your certificate is on a smart card, you might be asked to enter a PIN to access the certificate. Use your mouse to click and drag to draw the area where the signature should appear. Confirm your signature by clicking ‘Sign’ in the dialog box that follows.
- Save and Verify the Signed Document: Save the document after eSigning. You might choose to save it under a new name to distinguish it from the unsigned version. Optionally, you can verify the signature by clicking on the signature line. This should show details such as the signer’s identity and the certificate details, confirming the validity of the signature.
Adding an Invisible Digital Signature to Secure a Word Document
Securing your documents does not always need to show visible changes.
Here is how to add an invisible digital signature to your Word documents, maintaining their original appearance while ensuring their authenticity:
- Open Your Document: Start by opening the Word document or JPEG image that you want to eSign.
- Prepare to eSign: Click the ‘File’ tab, then select ‘Info’ from the sidebar.
- Add the Invisible Signature: In the ‘Info’ menu, click on ‘Protect Document’ (for Word), ‘Protect Workbook’ (for Excel), or ‘Protect Presentation’ (for PowerPoint). Choose ‘Add a Digital Signature’ from the dropdown options. Read the commitment statement that appears, which might include information on what signing will do to the document.
- eSign the Document: Click ‘Sign’ after you’ve read the commitment statement. If required, select your digital certificate from the pop-up window that appears. This certificate might be stored on your computer or a connected device, such as a USB token.
- Verify the Signature: After signing, a small signature icon appears at the bottom of the application window. Although invisible within the text itself, this icon indicates the document’s signed status. Recipients can click this icon to view details about the digital signature and the signer’s identity.
Why Transition from MS Word to Specialized eSignature Software for Document Signing?
Are you wondering how to electronically sign a Word document more efficiently?
While Microsoft Word allows for basic electronic signatures, specialized eSignature software offers more robust, secure, and versatile solutions.
Transitioning to a dedicated eSignature service can address the limitations inherent in Word, enhancing your document signing processes across all aspects. Start now!
Limitations of Using Microsoft Word to Add an Electronic Signature
Microsoft Word, despite its widespread use, faces several challenges that may hinder its effectiveness for electronic signatures.
1. Lack of Comprehensive File Support
Microsoft Word primarily supports document files and lacks seamless integration with other types, like PDFs or images, which are commonly used in business transactions.
For instance, if a client sends a PDF document or a JPEG image, you cannot use Word to eSign these files. This limitation restricts the utility of Word for businesses that deal with multiple document formats.
2. Inefficiency in the Signing Process
The process of adding a digital signature in Word can be cumbersome and not as intuitive as specialized service, leading to delays and reduced productivity.
Signing documents in Word requires creating a digital ID each time you need to sign a document. This process involves several steps:
- Clicking the signature line triggers a dialog box.
- Depending on the user, this box might redirect to Microsoft support for further instructions or require visiting the Microsoft website to manually obtain a digital ID.
- Digital IDs often come at a cost, as they need to be obtained from certified providers like GlobalSign or IdenTrust.
In contrast, specialized eSigning service, like DottedSign, streamlines this process significantly. With the service, signing a document often requires just a few clicks, without the need for separate digital IDs or additional steps.
This simplicity can dramatically increase efficiency and reduce the administrative burden, making it a preferred choice for businesses looking to optimize their document workflows.
3. Poor User Experience for Recipients
Recipients of Word documents might find it difficult to sign the document electronically without proper guidance or the necessary software, often leading to frustration and errors.
This is because the electronic signing process in Word does not consider the recipient’s user journey effectively.
Recipients need to read the document, decide on their interest, sign it, and then send it back. This process can be cumbersome and time-consuming without additional software to facilitate these actions.
4. Lack of Insights on Document Interactions
Gaining insights into how your documents are received and reviewed is essential for businesses.
Unfortunately, Microsoft Word falls short of offering insights into how and where recipients interact with the documents you send.
This lack of tracking analytics can be a significant drawback when trying to understand recipient engagement and optimize communications. This information is crucial for businesses to optimize their communication strategies.
Advantages of Using Specialized eSignature Service to Sign a Document
1. Compatibility with Multiple File Types
Do you need a flexible solution for managing diverse document types?
For those seeking guidance on how to electronically sign a Word document, DottedSign provides an intuitive platform designed to simplify this process across various file types.
Unlike Microsoft Word, which primarily handles DOCX files, DottedSign supports a vast array of file types, including PDFs and JPEG images.
This compatibility ensures that your business can manage all your documents efficiently from a single service.
2. Enhanced Signing Process
As businesses navigate their digital transformation journeys, the importance of enhancing employee productivity and collaboration has emerged as a primary goal, according to Foundry’s Digital Business study.
Learning how to electronically sign a Word document using an eSignature solution should be considered essential for all businesses today.
eSignature services like DottedSign not only streamline the signing process, enhancing speed and user-friendliness but also ensure security through AATL-authorized digital certificates.
Features like automated reminders, easy document tracking, and simpler ways to sign collectively enhance the efficiency of document management.
3. Better User Experience
Specialized eSignature service is designed to provide a smooth experience for users, making it simpler and more intuitive for both senders and recipients. It transforms the entire process into a seamless interaction.
Features like easy signature field placement, one-click sending, and real-time status updates on who has signed and who has not, are all designed to provide a better experience; saving you time and eliminating common frustrations associated with manual processes.
4. Valuable Insights and Analytics
If you are striving to enhance how you understand and interact with your clients, eSignature software such as DottedSign is right for you!
It offers analytics features that provide insights into document interactions. This data is invaluable for businesses looking to improve engagement strategies and understand client behaviors more deeply.
For example, imagine you are using the eSignature service to manage contract signings. The service can track who opens the document, how long they view each section, and when they sign it.
Let’s say a significant percentage of your clients are hesitating on a particular page of your contracts. With these insights, you can identify areas that may require clearer communication or simpler terms, potentially increasing your completion rates.
Your Business Growth Starts Here with DottedSign
Get our 14-day Business Plan trial to experience it for yourself.
Contact Us
Recapping How to Add a Signature to Word
So far, I hope you have already gotten rid of the tedious process of document signing in Word.
But just in case, let’s quickly recap how to sign a Word document electronically.
You can insert a scanned image of your handwritten signature, create a reusable text template, utilize Microsoft Word’s built-in signature line feature, or opt for third-party eSignature software like DottedSign!
eSignatures have transformed the way documents are signed, combining ease of use with security, ensuring the authenticity of the document.
Elevate Your Document-Signing Process with Advanced Software
In summary, specialized eSignature service like DottedSign outperforms Microsoft Word by offering broader file compatibility, a streamlined signing process, superior user experience, and valuable analytics.
For businesses prioritizing efficiency and comprehensive document management, switching to DottedSign is a strategic move toward enhanced operational effectiveness.
Enhance Your Signing Experience with DottedSign’s Cloud Integrations
DottedSign integrates seamlessly with popular systems including OneDrive, Google Drive, and Gmail, in addition to providing extensive signature features. This integration allows you to easily view and sign documents hosted on various sites, improving your process and increasing productivity.
Whether you are pulling contracts from OneDrive, proposals from Google Drive, or agreements received via Gmail, DottedSign ensures a smooth and efficient signing process.
Find out more about how we work with Microsoft OneDrive and other services here.
Consider Giving DottedSign a Try
DottedSign streamlines your document signing with top-tier security, universal file compatibility, and efficient management tools, and ensures your signatures are legally compliant and secure, with the ability to manage and track documents effortlessly from any location.
Which makes the path of learning how to electronically sign a Word document super easy!
Give DottedSign a try and experience the future of document signing today!
Using DottedSign Sign with Your Word Documents
[Quick Review] 5 Steps to Streamline Your Workflow Effortlessly with DottedSign
1. Register and Log In
Start by signing up for a 14-day free Business trial on DottedSign and log in. This is your gateway to simplified document management.
2. Upload Your Document
Easily upload the document by clicking the ‘+’ icon.
DottedSign supports multiple file types, enabling you to handle any document, from contracts to other official paperwork.
3. Enter Signer Details and Order
Provide the details of each signer, including names and email addresses.
Specify the order of signing for documents that require multiple signatures, ensuring a smooth process.
4. Assign Signature Fields
Direct each signer where to sign by assigning signature fields clearly.
This makes it easy for signers to know exactly where to sign, speeding up the process.
5. Send and Track Signing Progress
Send the document to all relevant parties and keep an eye on the signing progress. DottedSign’s tracking features let you see who has signed and who has not, ensuring all signatures are collected promptly.
This feature is essential for managing deadlines and ensuring that every signature meets both compliance and aesthetic standards.
Digitalize Your Business
- Enhanced workflow efficiency
- Advanced Security
- Simplified eSignature Processes
Start a 14-day Free Business Trial Today
Start Now
This streamlined process not only simplifies how you manage your documents but also ensures that they are signed efficiently and securely, enhancing your workflow with DottedSign.
Using DottedSign to apply your electronic signature to a Word document is not only easy but also secure. With features like encrypted signatures and compliance with international standards, you can be confident that your documents are legally binding!
Are you ready to transform your document signing process?
Do not let outdated processes slow you down!
Join thousands of professionals who are streamlining their workflows with our advanced eSignature solution.
Sign up for a 14-day free Business trial now, and experience firsthand how easy and secure signing documents can be.
Start your journey towards a seamless digital workflow with DottedSign — Sign up here!